Portal | DeFi Services
🌟 Status: Live
NodeOps Network Portal, lets you:
Work with $NODE
- Bridge $NODE
- Claim $NODE staking rewards
- Claim and restake $NODE staking rewards
- Convert gNODE to $NODE
- Claim the $NODE gNODE rewards
- Stake:
- Swap your $NODE
- Top up credits
- Transfer $NODE
- Unstake tokens
- View your $NODE balance
- View your staked balance/s
Work with UNO
- Mint an UNO
- Undelegate an UNO
Vote on Protocol Improvement Proposals
Bridge with NodeOps Portal
This guide walks you through bridging $NODE accross different chains. Use the video or walkthrough to understand how to bridge your $NODE.
Show me video
- Ethereum ↔ Arbitrum: Native bridge (up to 15-minute finality)
- Ethereum ↔ BSC: Official BSC bridge (7-day withdrawal)
- Arbitrum ↔ BSC: Third-party bridge via LayerZero (up to 15-minute finality)
The gas fee to bridge is always dynamic: based on network congestion.
Prerequisites
- EVM-compatible wallet containing $NODE
- Gas funds
- You are logged into the NodeOps Portal.
- From the Bridge tab, choose your source and destination chains.
Show me
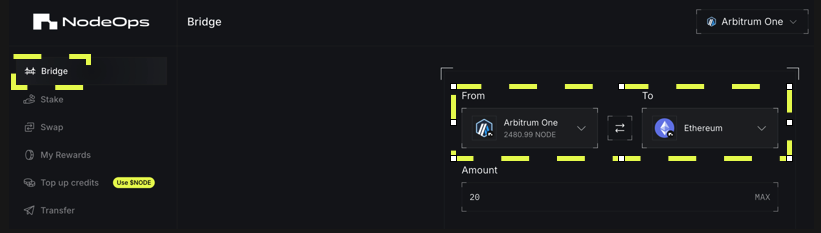
Ensure your wallet is connected to the source chain and has enough funds for gas on that chain.
- Enter amount: specify how much $NODE you want to bridge or use Max, review the transaction details, and confirm in your wallet.
Note that the dashboard displays your $NODE balance based on the origin chain.
Show me
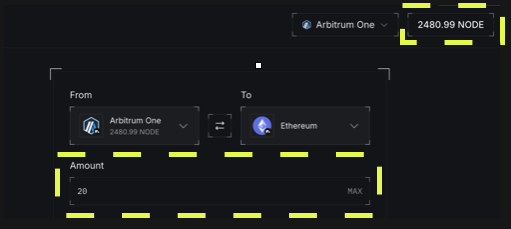
- Click Bridge Tokens.
Wait for completion: the bridge process may take a few minutes.
(Optional) verify the transfer
Either:
- Switch your wallet to the destination chain and check your balance to confirm the bridged $NODE
- Click View on explorer to examine the onchain record of the transaction
View $NODE in your wallet
Show me video
-
Log in to the portal.nodeops.network/transfer with your relevant wallet.
-
Select the chain your $NODE is on.
The airdropped $NODE is on Arbitrum One.
Show me
- You balance now shows at the top right of the dashboard.
Show me

Claim your $NODE staking rewards
Prerequisites
- You have unclaimed $NODE earned from staking
- Arbitrum ETH for gas fees
Use the video or walkthrough to understand how to claim $NODE staking rewards.
Show me video
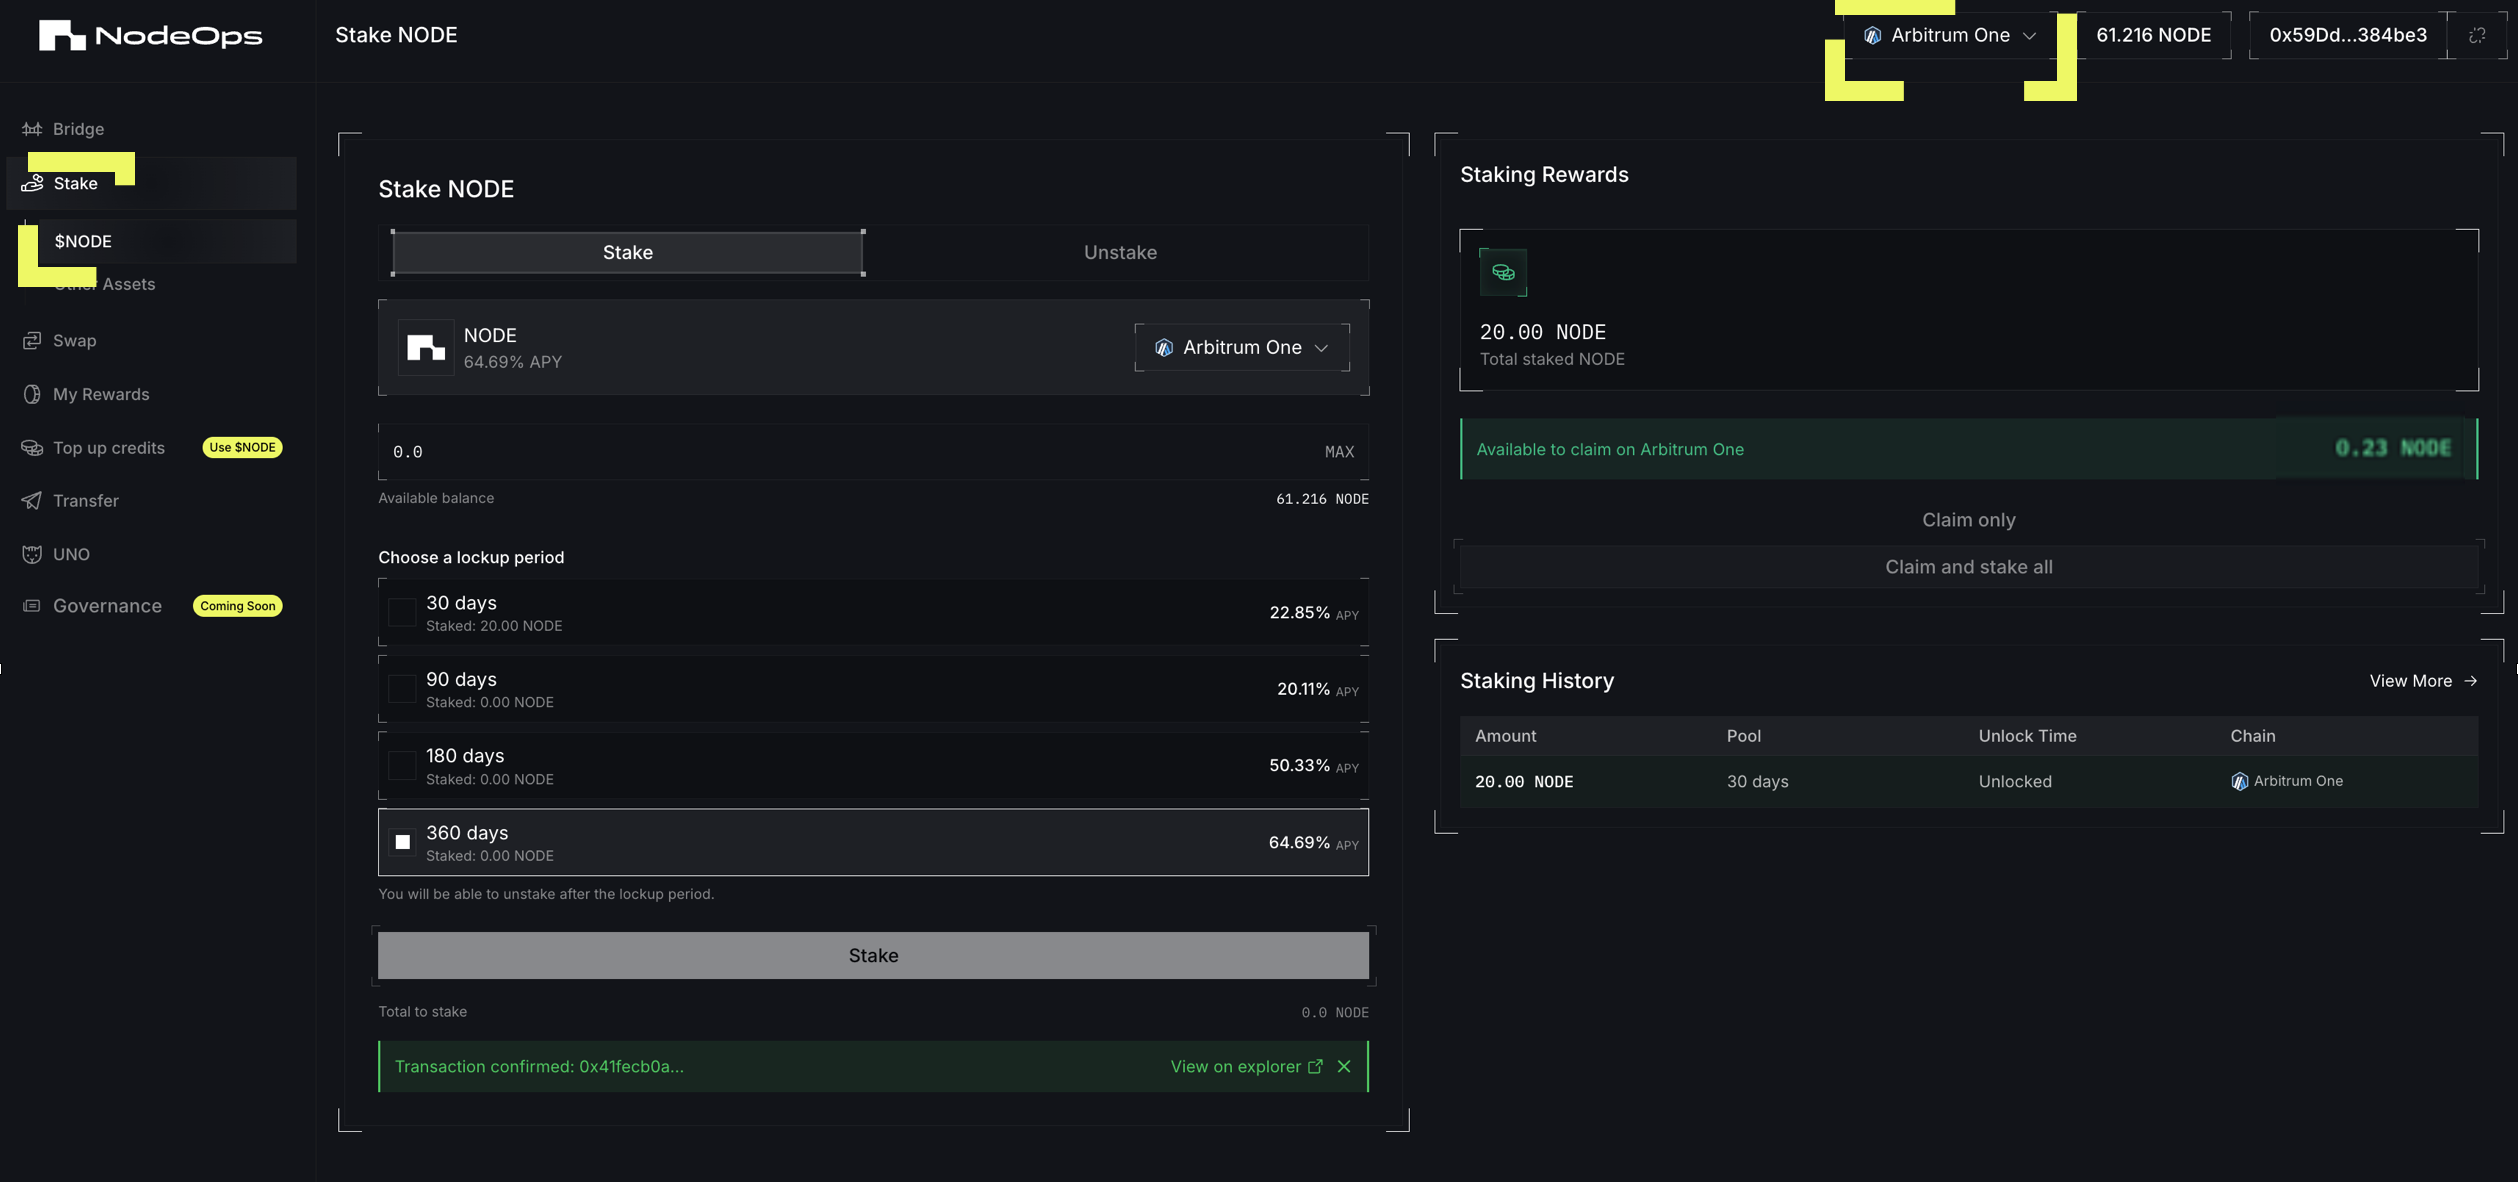
- Logged into Portal.NodeOps.Network/Stake, from the Stake tab, ensure you are on the Arbitrum One network and click $NODE.
Show me
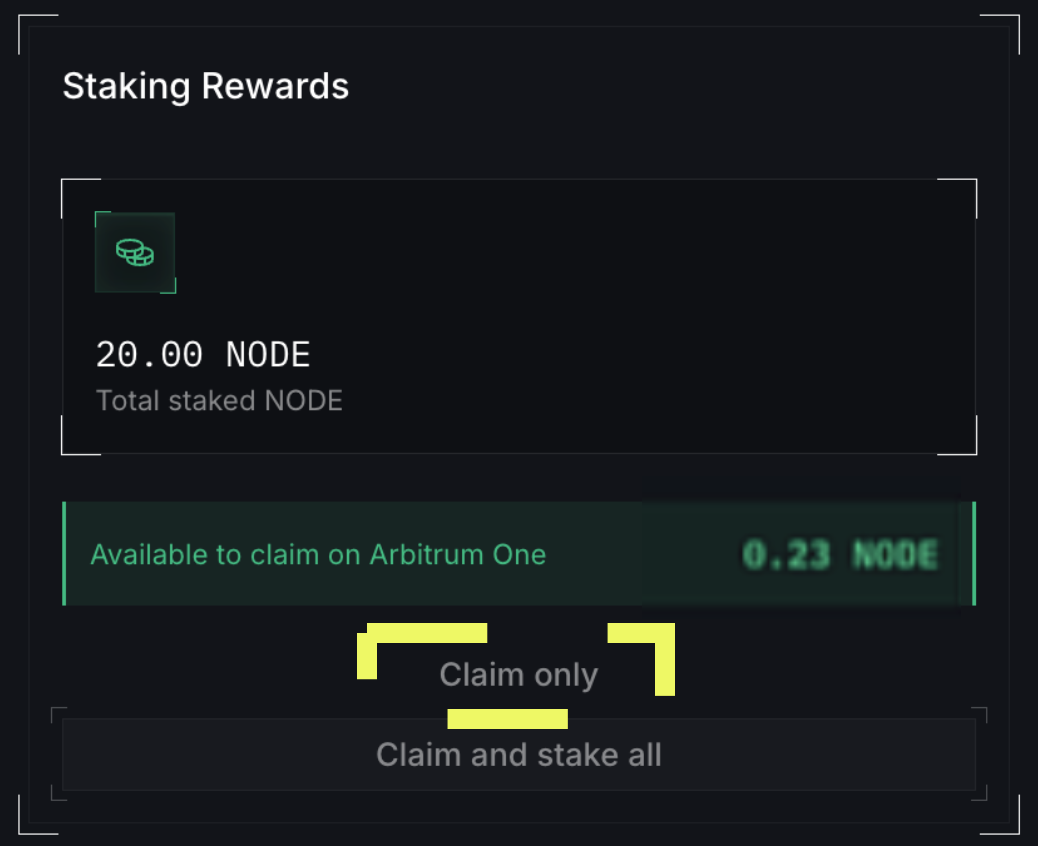
- To extract the $NODE to your wallet, click Claim only.
Alternatively, you may choose to restake the $NODE.
Show me
- Confirm the transaction in your wallet, noting the gas fee.
Congratulations, the $NODE is now in your wallet.
View your stakes
Prerequisites
- You have staked tokens with NodeOps Portal
- Logged into Portal.NodeOps.Network, from the Stake tab, click $NODE or Other Assets to review your active stakes.
Show me
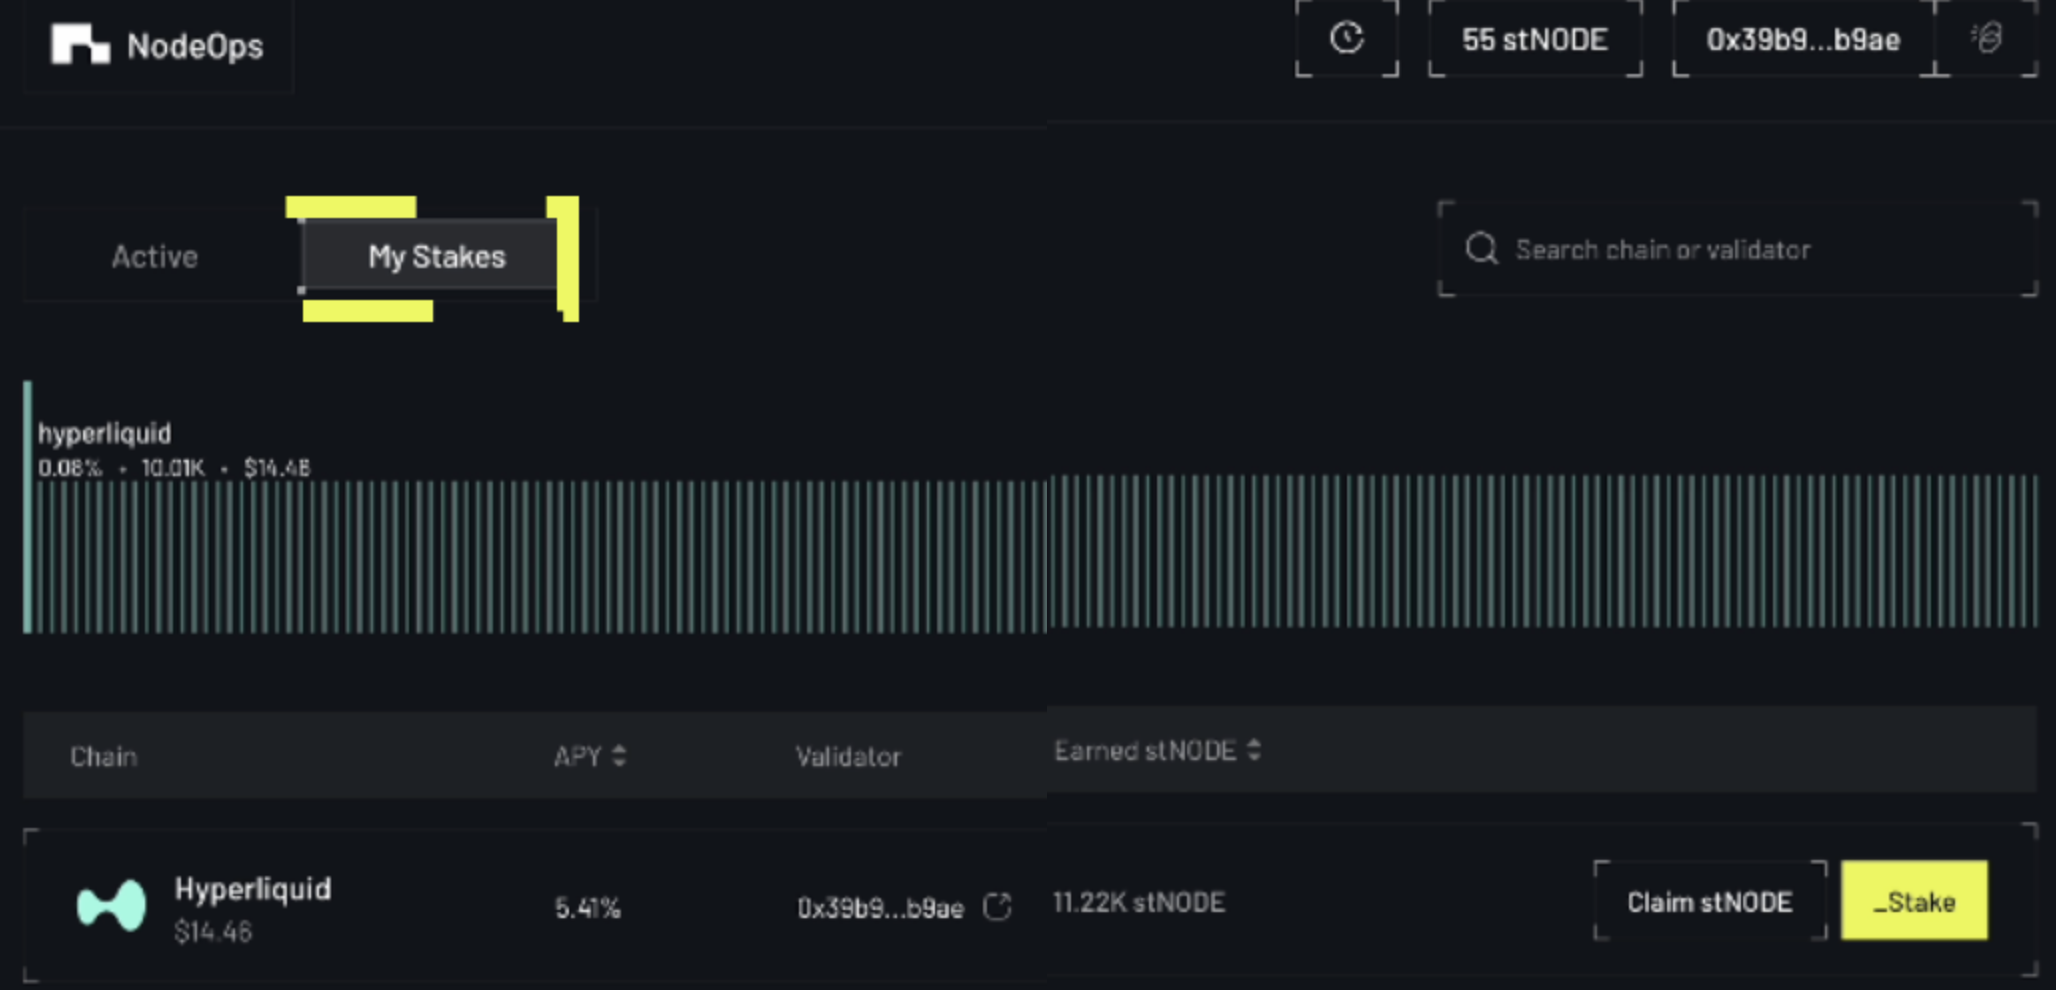
- Review the details.
Redeem gNODE with NodeOps Portal
NodeOps Portal allows you to convert the gNODE you earn across the NodeOps ecosystem into $NODE.
Use the video or walkthrough to understand how to redeem gNODE for $NODE.
Show me video
Prerequisites
- You are logged into NodeOps Portal
- EVM-compatible wallet linked to a NodeOps app that has earned gNODE
Remember to use a wallet that is linked to one of the NodeOps Core Services that has earned gNODE.
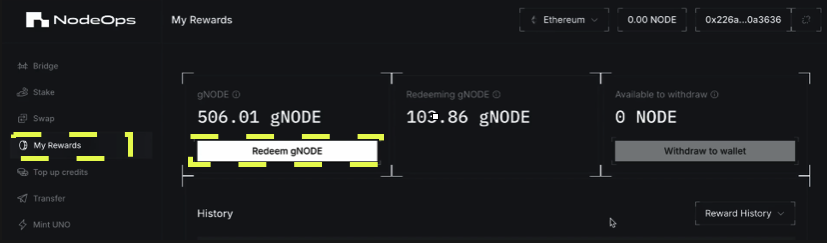
- From Portal's My Rewards tab, click Redeem gNODE.
Show me
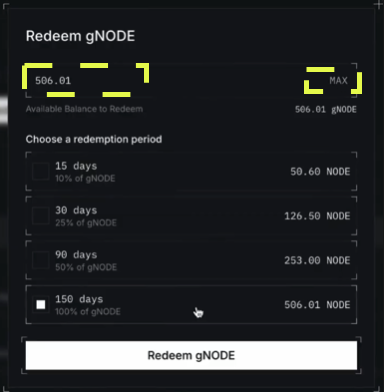
- Choose how much of your gNODE pot to convert, or select MAX to convert all.
Show me
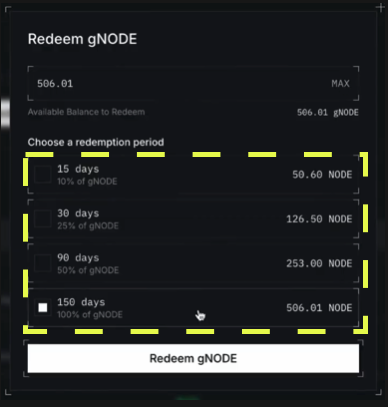
- Choose the redemption period, the time over which the gNODE is converted to $NODE.
The longer the period you set, the better the conversion rate:
- 100%: 150 days
- 50%: 90 days
- 25%: 30 days
- 10%: 15 days
Show me
- Click Redeem gNODE to confirm your choices.
Congratulations, your reward points are converting to $NODE.
Stake $NODE with NodeOps Portal
You may stake $NODE on:
- Arbitrum
- Binance Smart Chain
Follow the YouTube video, or the Get Started walkthrough.
Show me video
Stake supported tokens with NodeOps Portal
Show me supported tokens
- 🌟 Status: Live
- 🚧 Status: Coming soon
- 🏁 Status: Completed
- $ATH Mainnet
100 K gNode pool | ends 4th October, 2025
- $POL on Ethereum Mainnet
2 mil gNODE pool | ends 28th July, 2026
NodeOps is working hard to make our vision a reality:
- $HYPE Mainnet
- $ETH EigenLayer Mainnet
- $BEAM Mainnet
- $HYPE Testnet
Follow the YouTube video, or the Get Started walkthrough.
Show me video
Testnet $HYPE is used in this example, the flow is identical for other tokens.
Transfer with NodeOps Portal
This guide walks you through transferring $NODE. Use the video or walkthrough to understand how to transfer $NODE across chains.
Show me video
Prerequisites
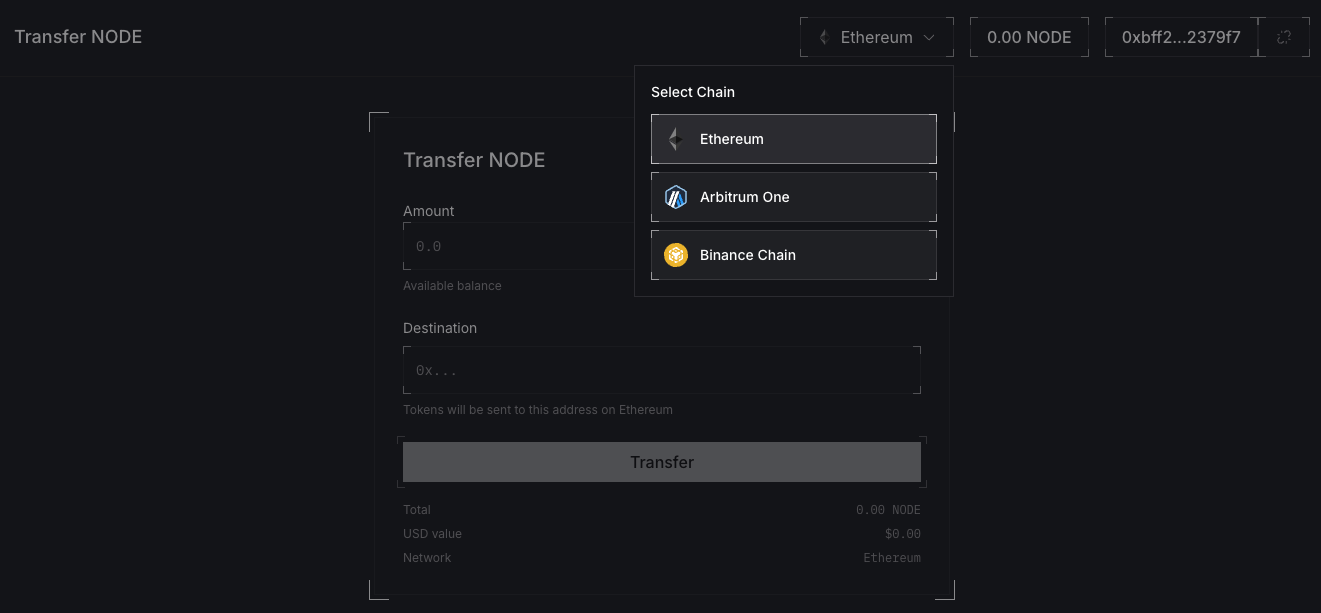
- Wallets:
- Sending wallet: EVM-compatible wallet containing $NODE
- Receiving wallet: EVM-compatible wallet
- Funds for gas on the chain your $NODE sits on
- You are logged into the NodeOps Portal with the sending wallet containing your $NODE
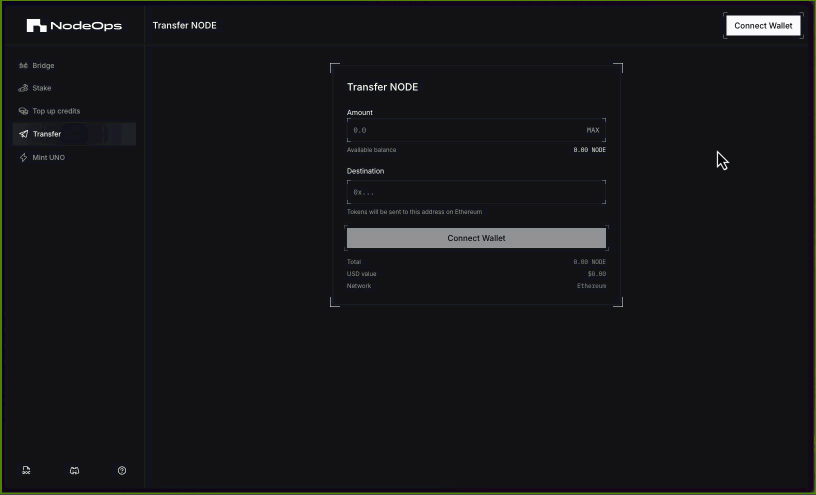
- Click Transfer on the left hand menu.
Show me

-
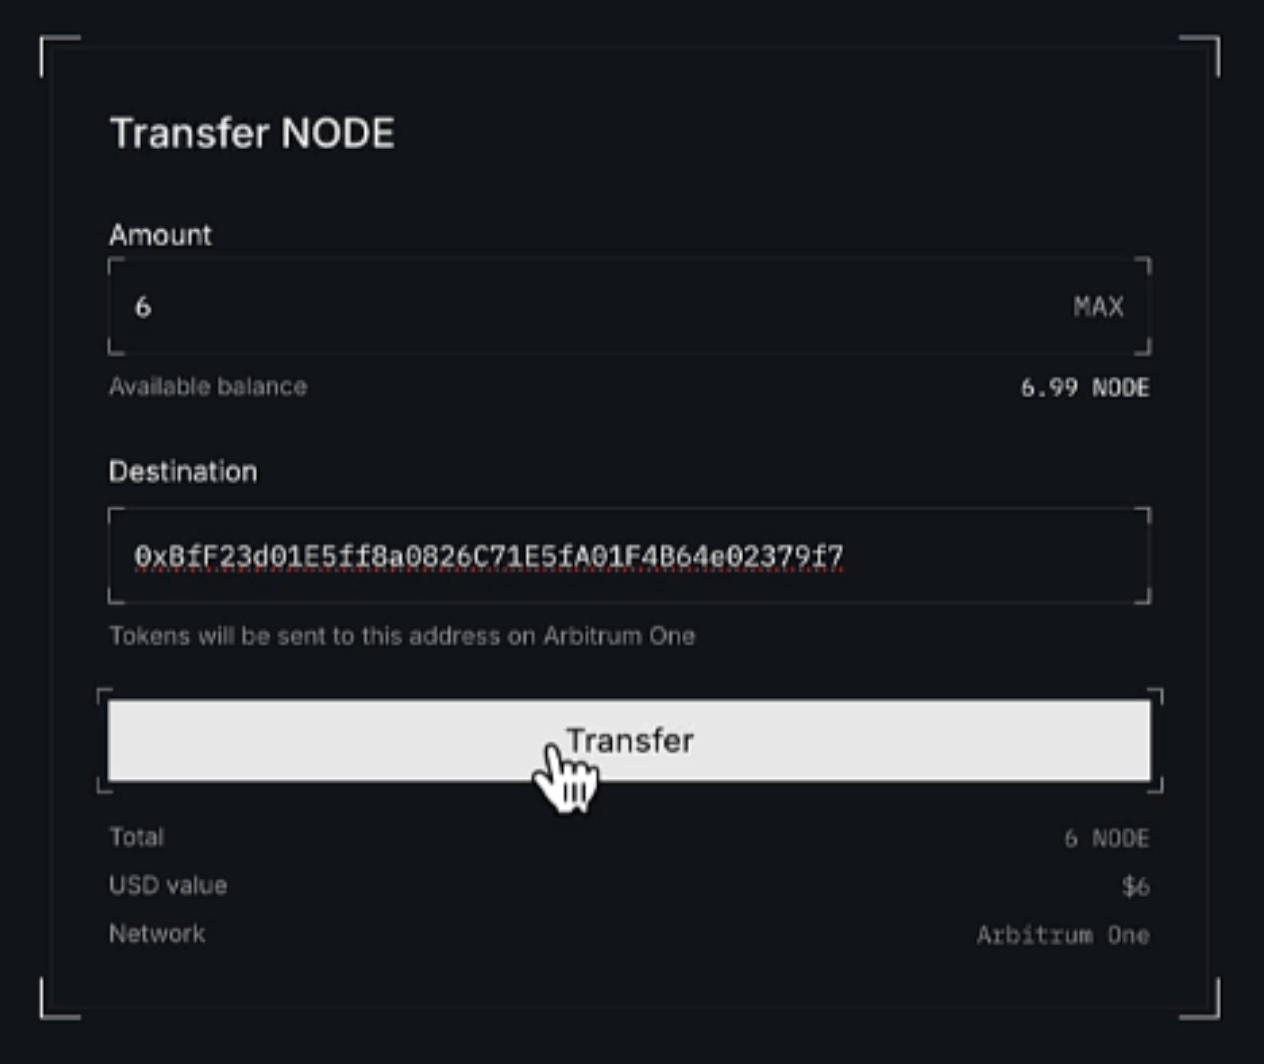
Enter the amount of $NODE to move.
-
Enter the destination wallet.
-
Click Transfer, review the transaction details, and confirm in your wallet.
Show me
(Optional) verify the transfer
Click View on explorer to examine the onchain record of the transaction.
Congratulations, the $NODE has been transferred via the same chain as the original sending wallet's $NODE.
Unstake your tokens
Use the video or walkthrough to understand how to unstake your tokens.
Show me video
Prerequisites
- EVM-compatible wallet linked to a NodeOps Portal account that has previously staked
- You are logged into NodeOps Portal
Remember that many Protocols apply a cool-down period for unstaking to protect their network.
For example, it takes 21 days to unstake the Beam Node token (license) or BEAM token.
- Click Stake on the left hand side of the dashboard, then select $NODE or Other Assets and click the Unstake tab.
Show me

- Review and confirm the transaction request in your wallet.
Congratulations, you should received an Unstake successful alert and may now close the form.
Undelegate your UNO NFT
Use the video or walkthrough to understand how to release your UNO NFT from the Operator Node that forms the Arbitrum L3 Protocol verification network for the NodeOps Protocol.
Show me video
Prerequisites
- UNO NFT delegated to an Orchestrator Node
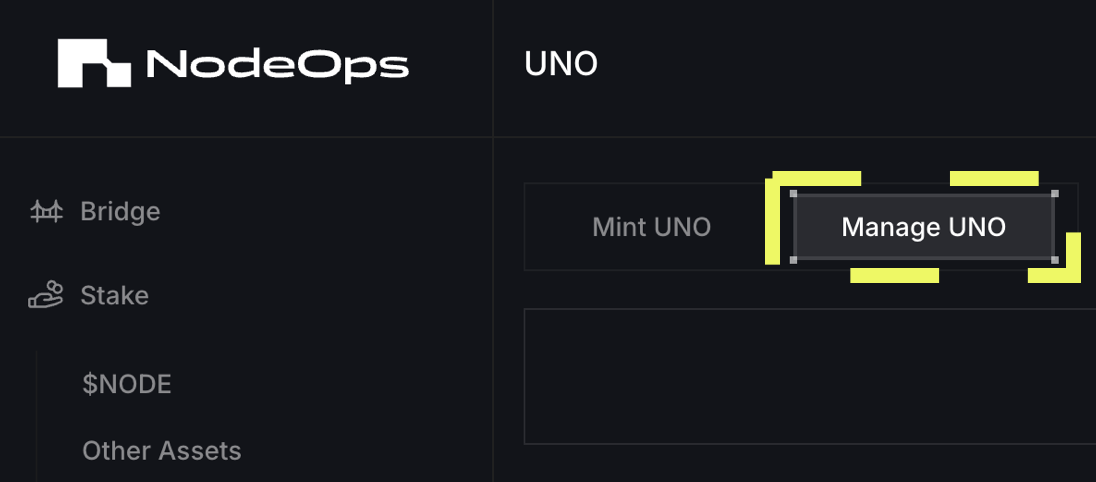
- Logged into Portal.NodeOps.Network, navigate to the UNO page.
Show me
- Select the Manage UNO tab and click Undelegate.
Show me
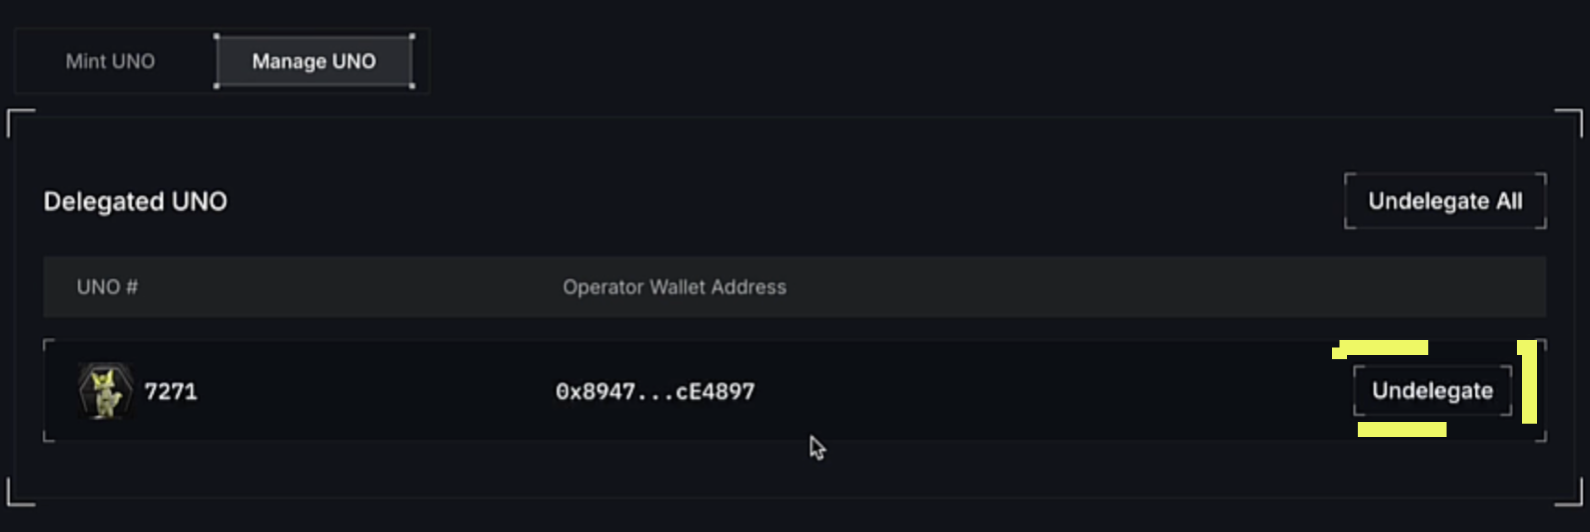
- Congratulations, your UNO NFT is no longer bound to the Operator Node.
What next?
- Delegate an UNO to verify the Protocol
- Learn about the $NODE tokenomics
- Learn more about the NodeOps Ecosystem core services
- Browse the Portal FAQ
- Discover NodeOps Cloud Marketplace templates